
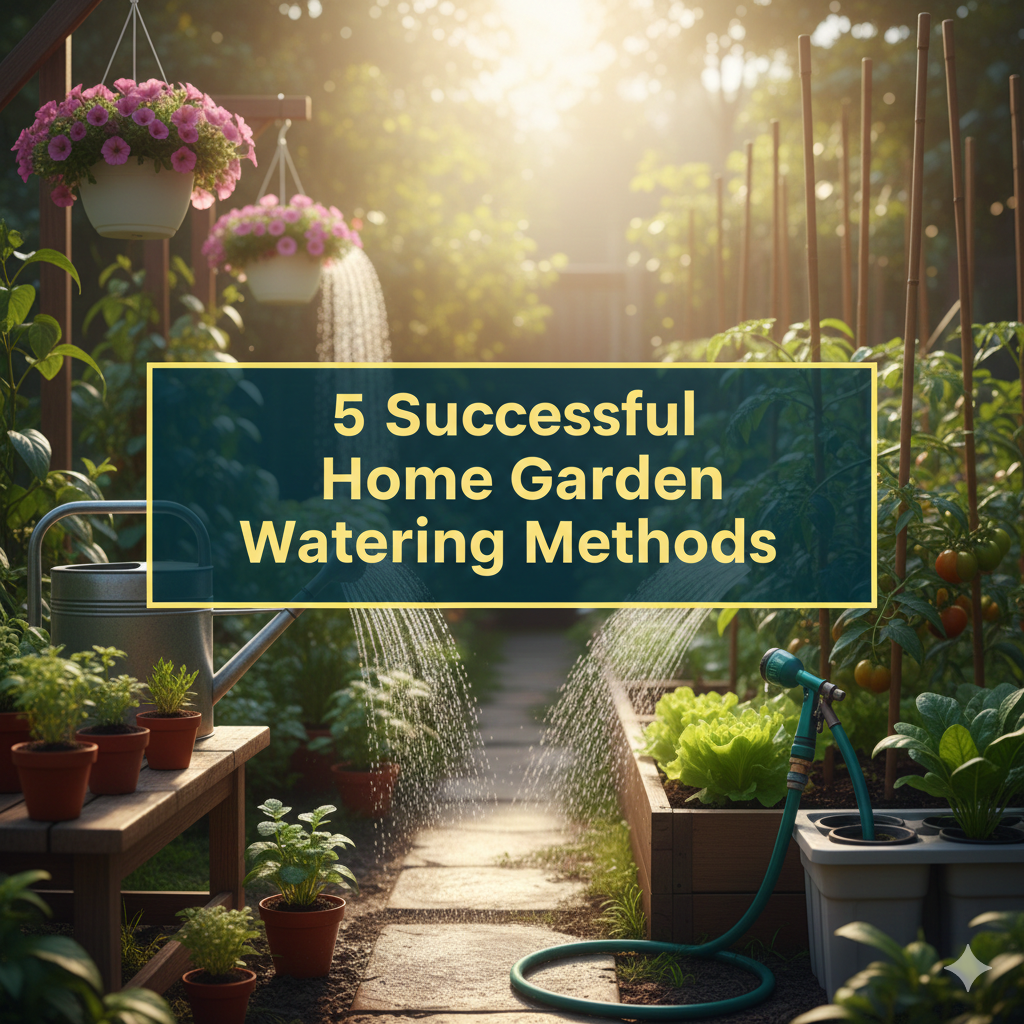
5 Successful Home Garden Watering Methods
Why Your Plants Want You to Water Them the Right Way
More plants are done in by overwatering than any other cause, gardeners included. Too much drowns the roots. Too little and they will be thirsty, weak.
The good news? You don’t need fancy equipment or a green thumb to water the garden properly. You simply need to know which tricks offer the most bang for your space.
This guide contains five effective watering techniques that work. Each will save you time, reduce water waste and help your plants stay healthier. Whether you are growing tomatoes on your balcony or tending a backyard vegetable patch, these methods will revolutionize the way you work in the garden.
Let’s dig in.
1. The Deep Soak Method: More Time, Less Often
How It Works
Many beginners send a quick sprinkle over their garden each day. This encourages them to be shallow-rooted and subject to daily waterings.
The deep soak does the opposite. You water infrequently, but when you do, you give your plants a good drink. The water soaks in 6-8 inches deep into the soil and holds, not splashing over or flowing out. Water extends dehydration of roots and nurtures for growth of healthy roots.
Step-by-Step Process
- Water in the early morning before it gets too hot with the sun
- Sprinkle water at the roots of each plant – squeeze the water really slowly to the base of each angle
- Ensure water absorbs fully, no puddling or runoff
- Stick finger into soil checking to a depth of 2-3 inches
- Only water once the top 2 inches feel dry
Why This Technique Wins
Deep-rooted plants handle drought better. When the surface dries out, they draw moisture from deeper soil layers. That means you can miss a day of watering without melting into an existential crisis.
Your plants also develop stronger stems and yield bigger yields. Plants that are weakly dependent beg the showers for return. Deep soaking builds resilience.
Best Plants for Deep Soaking
| Type of Plant | Watering Schedule | Root Depth |
|---|---|---|
| Tomatoes | 3-5 days | 12-18″ |
| Peppers | 4-6 days | 8-12″ |
| Squash | 3-4 days | 12-24″ |
| Beans | 5-7 days | 18-24″ |
| Cucumbers | 2-3 days | 12-18″ |
Common Mistakes to Avoid
Do not water on a schedule. Check your soil first. Clay soil holds water longer than sandy soil. Weather conditions change daily needs.
Water in the morning time that will prevent wetting of leaves, especially at evening times. Wet foliage invites fungal diseases. The focus should always be the soil at the base.
2. Drip Irrigation: The Set-It-and-Forget-It Solution
What Makes Drip Irrigation Special
Drip systems are set up to water plants at the roots through a complex of tubes and emitters. No spray. No waste. Just measured, accurate watering just where your plants need it.
This system uses 30% to 50% less water than traditional sprinklers. It also keeps the leaves dry, which minimizes disease issues.
Setting Up Your System
You don’t have to hire a professional installer to put in drip irrigation. The lower-end systems start at between $30 and $100, and setting them up takes an afternoon.
What You’ll Need:
- Main line (½” tubing)
- Drip emitters or drip tape
- Timer (optional but recommended)
- Pressure regulator
- Filter
- Pegs to hang tubes on
Attach system to outdoor faucet. Run the main line along your garden rows. Place emitters near each plant. Test and reposition emitters as necessary.
Customizing Water Flow
Some plants require more water than others do. Drip systems allow you to precisely control this.
Emitters have different flow rates:
- 0.5 GPH for little plants and seedlings
- 1 GPH for medium garden veggies and flowers
- 2 GPH for large shrubs and plants
Set up several emitters around larger plants. Use one emitter for small plants.
Maintenance Tips
Inspect your system weekly during the growing season. Check for clogged emitters, leaks or cut tubes.
Flush the lines at the end of every season. Run water through to prevent debris from forming.
Replace old emitters and tubing every 2-3 years. Plastic breaks down when exposed to UV over time.
Cost and Water Savings Comparison
| Method | Water Need (per 100 sq ft) | Monthly Cost | Setup Investment |
|---|---|---|---|
| Hand Watering | 150-200 gallons/week | $15-20 | $10-20 |
| Sprinklers | 200-300 gallons/week | $20-30 | $30-60 |
| Drip Irrigation | 80-120 gallons/week | $8-12 | $50-150 |
3. Soaker Hoses: Simple and Budget-Friendly
How Soaker Hoses Deliver Water
Soaker hoses are porous hoses that water all along their length. Just lay them in your garden beds, turn on the faucet, and water disperses right into the soil.
They function like a low-pressure drip-irrigation system but are cheaper and easier to put in. Ideal for raised beds, vegetable plots and flower borders.
Installation Strategy
Run soaker hoses in serpentine patterns through your beds. Position them no more than 2 inches from plant stems.
Use landscape staples every 2 to 3 feet to hold the hose in place. This keeps them from sliding around while you work in your garden.
Mulch hoses with 2-3 inches of mulch. This helps to prevent the hose from being damaged by UV rays and cold weather, as well as water evaporation.
Running Time and Pressure
Soaker hoses require very low water pressure (10-25 PSI). High pressure can lead to uneven watering and may harm the hose.
Run your soaker hose for 30-45 minutes each time. Check the soil at the end of a line. If it is too dry, run the hose longer next time.
When Soaker Hoses Work Best
These hoses excel in:
- Rectangular raised beds
- Long vegetable rows
- Perennial flower borders
- Newly planted areas
They struggle in:
- Large open areas
- Slopes (water pools at the bottom)
- Container gardens
- Widely spaced plants
Troubleshooting Common Issues
Unequal Water Delivery: Water runs faster from the beginning of the hose. Limit hose runs to 50-75 feet. Use a few short hoses instead of one long hose.
Clogged Pores: Hard water is rich in minerals and soaker hoses can easily get clogged. Flush once a month (and, if you have very hard water, use filtered water).
Rodent Damage: Soaker hoses are known to fall victim to the sharp teeth of mice and voles, which chew through them on occasion. Check it often and when you find holes, patch them with hose-repair tape.
4. The Two-Zone Timing Strategy
Why When You Water Matters More Than What You Water
Water at the right time and you are aiding nature. Water at the wrong time and you are fighting against it.
Early morning is when plants take up water most effectively. The soil is cool. Air is calm. Water has time to soak all day before the sun is high.
Morning Watering: The Gold Standard
Water between 5 AM to 9 AM. Watering between these hours will be most effective.
Benefits:
- Minimal evaporation loss
- Leaves dry quickly (prevents disease)
- Hydrates plants in advance of afternoon heat
- Water pressure is typically higher
Program your irrigation system timer or make watering in the morning part of your breakfast routine.
Evening Watering: Your Backup Option
Life gets busy. If you can’t water in the morning, late afternoon (4 PM – 6 PM) is your next best option.
Important rules for evening watering:
- Water 2 hours before sunset
- Avoid getting foliage wet
- Use drip or soaker hoses (not sprinklers)
- Focus on the root zone only
That gives leaves a chance to dry out before night falls. Wet leaves overnight create perfect conditions for fungal diseases.
The Midday Mistake
Don’t ever water between 10 AM and 3 PM, unless you are in a dire plant situation.
Water gets lost through evaporation—up to 50% of water is evaporated before it reaches the roots. The sun can also scorch wet leaves in the magnifying glass effect.
Seasonal Timing Adjustments
Spring and Fall: Water every 3 to 5 days. Cooler temperatures reduce evaporation.
Summer: Water every 2-3 days. High heat increases water needs.
Winter (in warmer climates): Water once in 7-10 days. Plants become semi-dormant and require less water.
Smart Timer Programming
| Season | Frequency | Length | Time |
|---|---|---|---|
| Spring | 3 days | 45 min | 6 AM |
| Summer | 2 days | 60 min | 5:30 AM |
| Fall | 4 days | 30 min | 7 AM |
| Winter | 10 days | 20 min | 8 AM |
5. The Mulch-Enhanced Watering Technique
How Mulch Transforms Water Efficiency
Bare soil loses water fast. The sun bakes the surface. Wind accelerates evaporation. Rain runs off it, rather than soaking into the ground.
Cover it with just a little mulch, and the whole game changes. Mulch is like a protective blanket for the ground, keeping the moisture locked in.
Choosing Your Mulch Material
Different mulches serve different purposes.
Organic mulches (decompose naturally over time):
- Shredded bark: Lasts 2-3 years, looks decorative
- Wood chips: Lasts 1-2 years, you can get this for free from tree services
- Straw: Effective for 1 year, great for vegetable gardens
- Grass clippings: Lasts a few weeks, high in nitrogen
- Compost: Lasts 1 season, provides extra nutrients
Inorganic mulches (permanent):
- Gravel: Doesn’t ever break down, useful for drought-tolerant plants
- Landscape fabric: Stops weeds but can trap heat
- Rubber mulch: Durable but does not improve soil
Proper Mulch Application
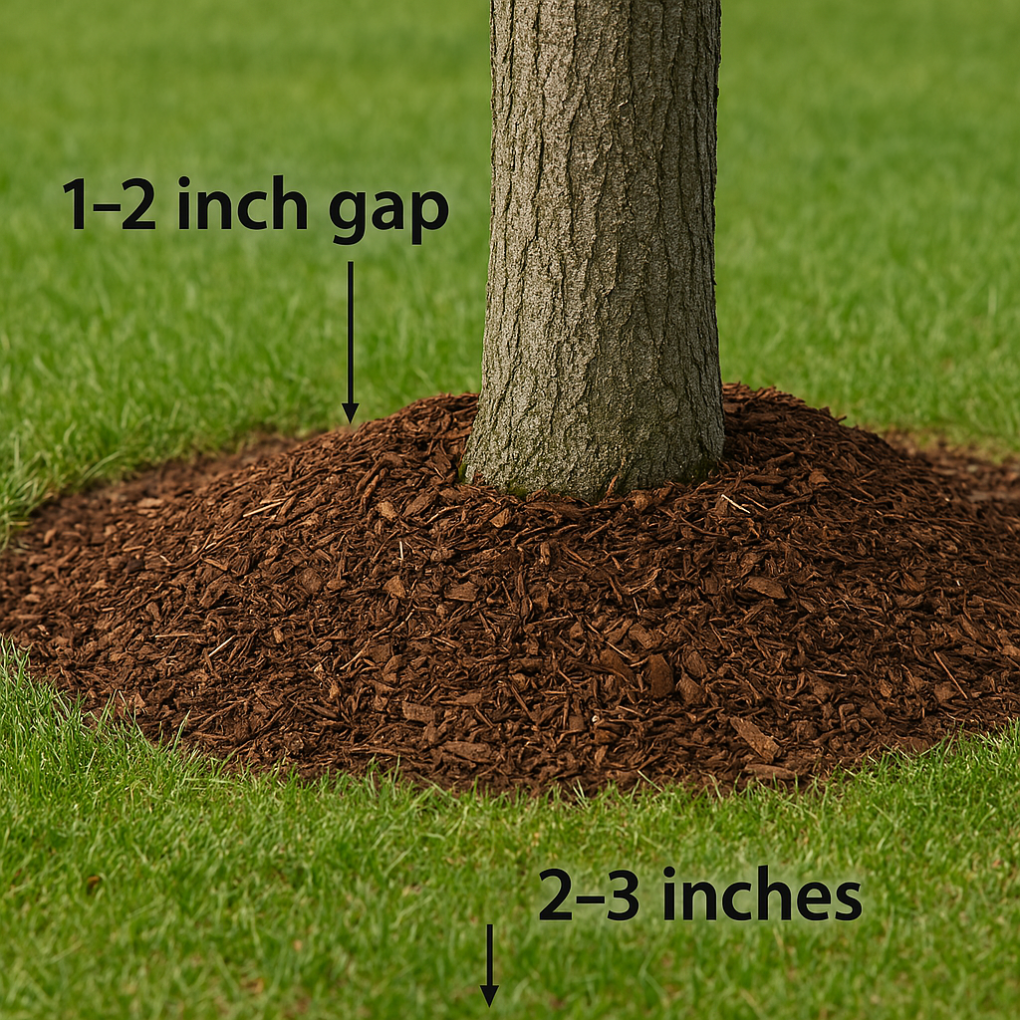
Apply mulch 2 to 4 inches deep around plants. Too thin and it won’t hold back the weeds or retain moisture. Too thick and it can smother roots.
Around plants and trees, keep mulch 2-3 inches away from the plant base or trunk. Mulch heaped up against stems retains moisture and attracts rot.
Refresh organic mulch annually. As it decomposes, it enriches your soil.
Water Retention Benefits
Research has shown that mulched gardens typically require 25-50 percent less water than unmulched ones. The mulch layer:
- Reduces evaporation from sun and wind
- Keeps soil cooler in summer
- Prevents water from running off in heavy rains
- Maintains more consistent soil moisture
The Mulch-Watering System Combo
Combine mulch with drip irrigation or soaker hoses for best results.
Install your irrigation system first, then top with mulch. This:
- Hides unsightly hoses
- Shields irrigation tubing from UV rays
- Prevents soil from clogging emitters
- Creates the highest water conservation setup possible
Seasonal Mulch Management
Spring: Gently pull back mulch to allow soil to warm. This helps seeds germinate.
Summer: Increase depth of mulch to 4 inches to help with heat and drought.
Fall: Add fresh mulch to protect roots through winter.
Winter: Leave mulch in place. It insulates the soil against freezing and thawing.
Testing Soil Moisture: Stop Guessing, Start Growing
The Finger Test (Free and Easy)
Insert your finger 2-3 inches into the soil beside your plants.
- Wet and muddy: Don’t water just yet
- Moist and cool: Perfect moisture level
- Dry and crumbly: Time to water
Check morning and evening when you first begin gardening. Soon enough, you will understand how your soil behaves.
The Screwdriver Test
Insert a long screwdriver into the soil. It should slide in easily for 6 to 8 inches.
If it stops sooner—at 3 or 4 inches down—the soil beneath is dry. Your plants need water.
This method is great for lawns and larger garden areas.
Moisture Meters (Under $15)
These tools require no battery and offer quick readings. Stick the probe into the soil and read the dial.
Most meters show three zones:
- Red (dry): Water immediately
- Green (moist): Perfect
- Blue (wet): Let soil dry out
Test in several places in your garden. Moisture levels vary by location.
Smart Soil Sensors (High-Tech Option)
Advanced sensors monitor soil moisture levels and connect to Wi-Fi systems for 24/7 readings. They will send an alert to your phone when plants need water.
Some models even connect to your irrigation system and water automatically.
Sensors are available at $30-150 each. Worth it if you have a big garden or travel often.
Signs Your Plants Need Water
Visual cues:
- Wilted leaves in the morning (not only in the afternoon)
- Gray-green or dull leaf color
- Slow growth
- Leaf edges turning brown
- Flowers dropping prematurely
Important: Always check soil moisture before watering wilted plants. Overwatered plants wilt because the roots rot and can no longer uptake water.
Combining Techniques for Maximum Results
The Ultimate Water-Smart Garden
You don’t have to pick just one method. The most successful gardens use different techniques in combination.
Example setup:
- Install drip irrigation for baseline watering consistency
- Add 3 inches of mulch to conserve moisture
- Water by early morning on timer
- Deep soak while hand-watering
- Check soil moisture before watering
This approach reduces water usage by 50-70% and results in healthier plants.
Adapting to Your Garden Type
Container gardens: Drip emitters + morning watering. Monitor moisture levels daily during hot weather.
Raised beds: Soaker hoses + mulch work best. Simple installation due to enclosed space.
In-ground rows: Drip irrigation + mulch + deep watering = professional quality.
Mixed plantings: Combine techniques. Use drip for vegetables, soaker hoses for flower borders, deep soak for trees and shrubs.
Tracking Your Progress
Keep a simple garden journal. Note:
- When you water
- How long you water
- Weather conditions
- Plant growth and health
Patterns emerge quickly. You will find out precisely what your garden requires.
For more beginner-friendly gardening tips and techniques, visit Home Gardening Beginners for comprehensive guides on starting and maintaining your home garden.
Frequently Asked Questions
Q: How often should I water my vegetable garden?
A: Water every 2-5 days based on soil type and weather conditions. Check soil moisture 2 to 3 inches below the surface. Water when the top 2 inches are dry. Instead of watering lightly every day, deep soak each time.
Q: What is the best time of day to water plants?
A: Early morning (5-9 AM) is best. There is higher water pressure, lower evaporation, and leaves dry out very fast. If you miss the morning, water by 6 PM so foliage can dry out before night falls.
Q: How can I tell if I’m overwatering?
A: When plants are overwatered, leaves wilt and turn yellow, and roots feel soft and brown. The soil will feel wet and possibly smell bad. Allow the soil to dry between waterings, and improve drainage with compost.
Q: Is it okay to use greywater for watering the garden?
A: Yes, but only greywater from showers, baths and washing machines using plant-friendly detergents. Don’t ever use water from toilets or dishwashers. Do not use greywater on edible portions of vegetables. Safe for fruit trees, ornamentals and root crops.
Q: How thick should the layer of mulch be around plants?
A: Apply mulch 2-4 inches around plants. Mulch should be kept several inches away from stems and trunks. Too-thin mulch does not suppress weeds or retain moisture. Too-thick mulch can smother roots and encourage rot.
Q: Will drip irrigation work in small gardens?
A: Absolutely. Drip systems are ideal for gardens of any size. Smaller kits begin at $30 and water 25-50 square feet. Perfect for raised beds, container groupings and small vegetable plots.
Q: Should I water plants when it’s raining?
A: Do not water when it is raining, unless plants are under a rain shelter. Wait until it stops raining to check soil moisture before watering again. One inch of rainfall will generally provide the soil with enough water to last for 4-7 days, depending on temperature and soil type.
Q: How can I winterize my irrigation system?
A: Remove all water from lines before the first freeze. If you live in a cold climate, blow out any remaining water with compressed air. Take timers and filters inside for storage. Turn off outdoor water valves. Learn more about winterizing your garden equipment from the USDA.
Water Your Way to Success
Start Small and Build
Do not attempt to use all five methods at the same time. Choose one that matches your current setup.
New gardeners: Begin with the deep soak approach and morning waterings.
Busy gardeners: Add drip irrigation or soaker hoses before planting.
Budget-conscious: Start with mulch and the finger test for moisture.
Add more techniques as you get comfortable.
The Real Secret to Success
Consistent watering is more important than perfect watering. A simple system that you actually use is better than a complicated one that you don’t.
Pick a strategy that aligns with your schedule and level of commitment. Your garden will thank you.
Your Next Steps
- Assess your current watering situation
- Identify problem areas (time, water waste, plant health)
- Choose one method from this guide
- Implement it this week
- Track results for two weeks
- Add another technique when ready
Great gardens are not made in a day. They are built up with small, consistent improvements.
Start watering smarter today. Your plants—and your water bill—will show the difference within weeks.