
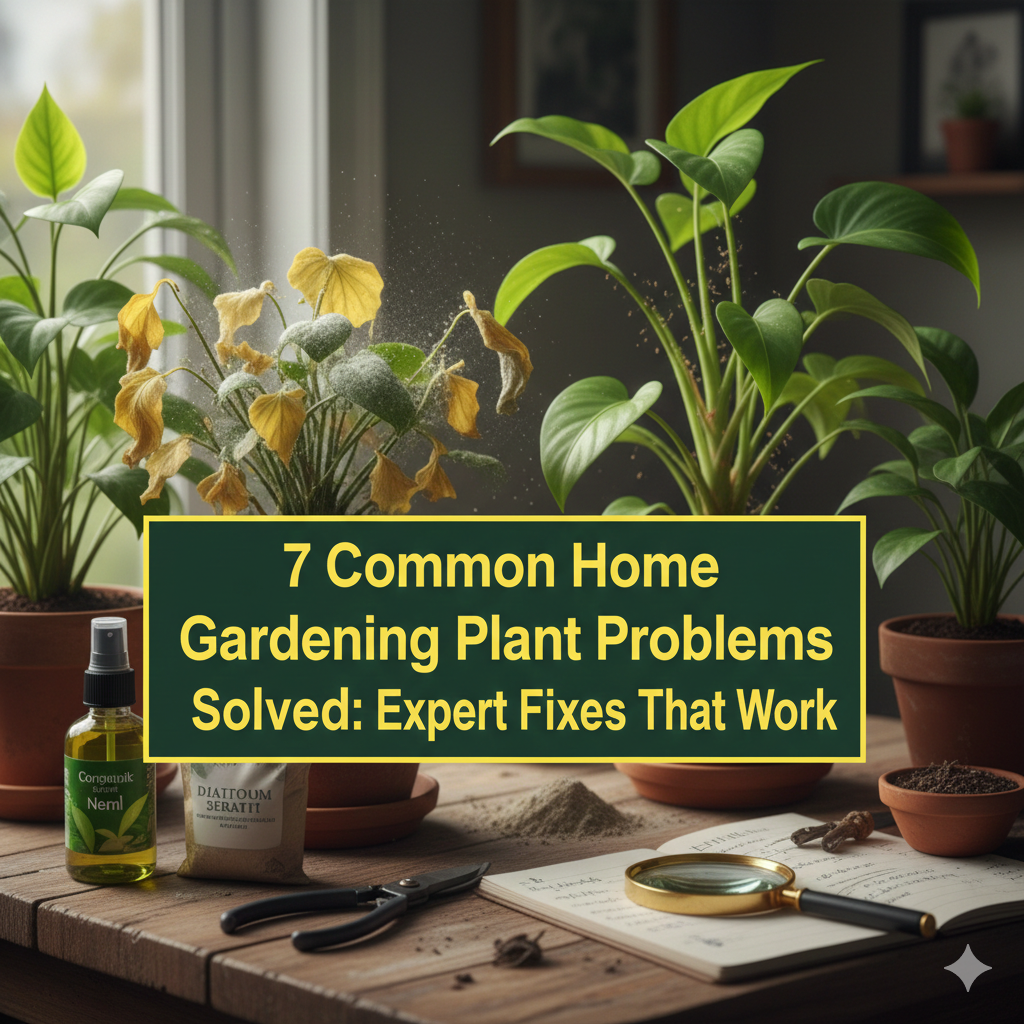
7 Common Home Gardening Plant Problems Solved: Expert Fixes That Work
When Plants Struggle, Gardeners Worry
You faithfully water, shine the sun on them and love your plants well. Yet something goes wrong. Leaves turn yellow. Stems droop. Mysterious spots appear overnight. Growth stops completely.
All gardeners go through such moments of frustration. The good news? Most plant problems are easily solved, once you figure out what is actually causing them. The issue is making an accurate diagnosis — other things frequently look suspiciously similar.
This complete guide addresses the seven most common home gardening plant problems in easy-to-follow, practical ways. You’ll learn to read the distress signs on all of your plants, understand and diagnose new problems, and even avoid them before they start.
Stop guessing and start solving. Your plants are attempting to communicate very specifically what is wrong. Let’s learn their language together.
Yellow Leaves: The Least Understood Signal
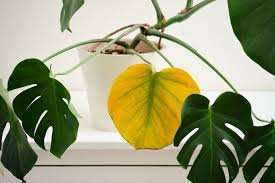
Few gardening symptoms induce panic quite like yellow leaves. But leaf yellowing comes for a multitude of reasons. Knowing which kind of yellowing is afoot can make all the difference.
Different Yellowing Patterns Mean Different Things
Lower Leaves Turning Yellow: If just the oldest leaves or lower leaves are yellow and new growth is green, your plant probably needs nitrogen. That nutrient easily moves around inside plants, so the plant sucks nitrogen out of its old leaves to fuel new growth.
General yellowing of the whole leaf is due to nitrogen deficiency. Leaf changes to soft green, then pale green, then gold before dropping.
Upper Leaves Yellowing: New growth that comes in yellow while old growth remains green is typically a symptom of iron deficiency. This is particularly prevalent in alkaline soil that ties up iron so the roots of plants cannot get to it.
Iron-deficient leaves become yellow between the veins and the veins themselves remain green. This unique pattern allows an easy recognition of iron deficiency.
All Leaves Turning Yellow: If all of your plant’s leaves are yellowing at the same time, it’s usually due to overwatering. The waterlogged soil chokes the roots making them unable to take in nutrients. The whole plant suffers simultaneously.
Plants that are overwatered also have soft, mushy stems and soil that remains wet for days. Fungus gnats are commonly found in constantly damp soil.
Fixing Yellow Leaf Problems
For Nitrogen Deficiency: Feed with a balanced fertilizer that is higher in nitrogen (the first number in the N-P-K ratio). Fish emulsion liquid acts fast for temporary relief. Feed plants every two to three weeks during growing season.
Mix compost into the soil as a slow-release source of nitrogen. As the organic matter breaks down, it slowly releases nutrients.
For Iron Deficiency: Test for soil pH. Iron is released in slightly acidic conditions (pH 6.0-6.5). If the soil is overly alkaline, incorporate elemental sulfur or use acidifying fertilizers.
Use chelated iron as a quick fix. This unique iron is easy for plants to uptake and can be applied in all soil types. Spray directly on leaves or water into soil.
For Overwatering: Discontinue watering and allow the soil to dry well. Ensure pots have drainage holes. Take your plants out of damp soil and trim any black, squishy roots, then repot with fresh, fast-draining mix.
From now on, water when the top two inches of soil feel dry to your finger. These are typical home gardening plant problems solved through improved watering techniques that will save a lot of headaches.
Wilting Despite Wet Soil: The Root Rot Mystery
Plants that droop and wilt even though the soil feels damp confuse many gardeners. You keep watering, imagining the plant still needs more water, but it only becomes worse. This paradox signals root rot.
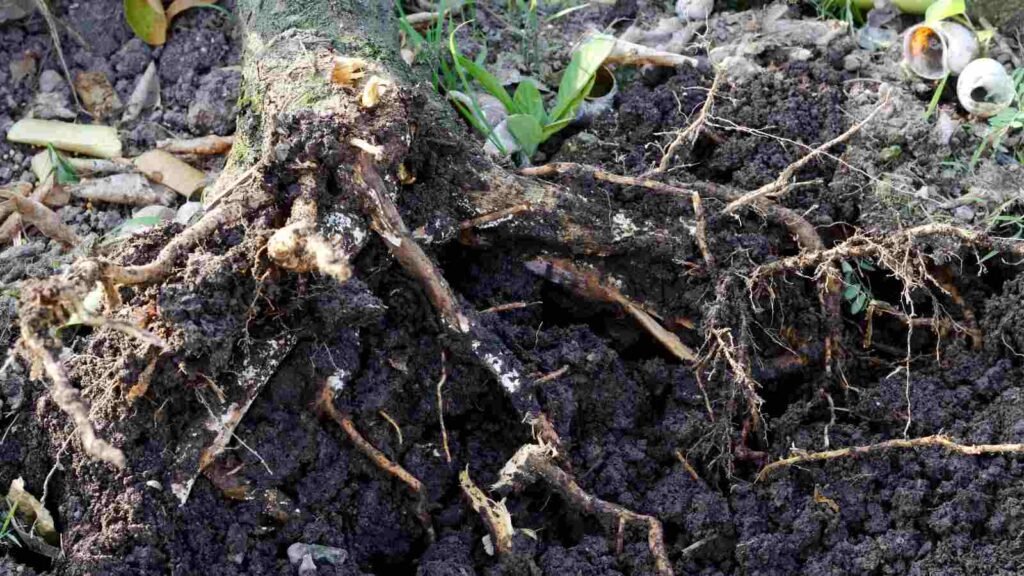
How Root Rot Develops
Roots need oxygen just like leaves do. Air pockets in saturated soil fill with water. Roots quite simply suffocate then decay and die from fungal infections.
Dead roots can’t take up water, so the plant droops from lack of moisture even though it’s sitting in mud. Damage is taking place down in the ground where you can’t see it, until symptoms show above soil.
Identifying Root Rot
Visual Symptoms: If wilting persists after watering, the problem is likely in the roots. Leaves could yellow, brown, or fall out. Stems are soft at the soil line. The entire plant has a look of stress but the soil appears to be moist enough.
Below the Surface: Carefully lift the plant out of its pot. For healthy roots, they should be white or tan in color and feel firm. Decayed roots will be black or brown and feel spongy, like overcooked spaghetti. They are frequently unpleasant and slimy to smell.
Saving Plants with Root Rot
Immediate Action: Immediately remove the plant from wet soil. Shake away as much old soil as you can. Snip all black, mushy roots away with clean, sharp scissors. Cut to healthy white tissue even if it requires cutting 50% or more of the roots.
Rinse remaining roots under running water. Air dry 30 minutes.
Repotting Strategy: You will need a new pot with drainage holes. Opt for a pot only slightly larger than the remaining root mass. Fill with fresh, well-draining potting mix—don’t use that old infected soil again.
Water gently after repotting, then allow the soil to dry fairly well before watering again. The reduced root system can’t absorb much water, and so the plant needs less water until new roots develop.
Recovery Period: Prune some top growth to match the reduced roots. The remaining roots can’t handle as much leaf area. Put the plant in a spot with bright, indirect light to stimulate new root growth without stressing it out further.
Recovery takes 4-8 weeks. Look for new growth, which is an indication the plant is sending down new roots. These common home gardening plant problems resolved early have a far better survival rate than advanced cases.
Pests That Appear From Nowhere
One day your plants are perfect. The next morning, you see tiny bugs on leaves or sticky residue on stems. House and garden plants both come under attack by a number of pests which chew foliage and can transmit disease.
The Most Common Garden Pests
Aphids: Tiny, pear-shaped insects come in clumps and feed on new growth and the undersides of leaves. They are available in green, black, brown, yellow or pink. Aphids feed on plant juices, resulting in curled, yellow or distorted leaves.
They multiply at an astonishing rate — one aphid can produce 80 offspring over a week. They also produce a sticky honeydew that invites ants and encourages black sooty mold.
Spider Mites: They are so small you can barely see them, but a plant infected with spider mites will have little moving dots on its foliage. They make fine webbing between leaves and stems. When the infestation is heavy, the leaves become stippled and yellow and will drop off.
Spider mites prefer hot, dry weather. Indoor low humidity plants are especially at risk.
Whiteflies: Small white insects that swarm under leaves. Brush an infested plant and it sends up clouds of tiny white flies. As with aphids, they suck sap and excrete honeydew. Heavy infestations can debilitate plants as well.
Mealybugs: White, cottony-looking bugs that hide in the leaf joints and along stems. They either crawl slowly or remain still while feeding. Mealybugs are very persistent and may have to be treated a few times before they go away.
Quick Pest Solutions
For Aphids: Hose down plants with a strong stream of water to dislodge aphids. They can’t crawl back up. Do it once every few days for two weeks.
Combine 1 tablespoon liquid soap with 1 quart water. Spray directly onto aphids, making sure they are completely covered. The soap dissolves their protective coating. Reapply every 2-3 days. For more organic pest control methods and beginner gardening tips, explore comprehensive guides that help protect your plants naturally.
For Spider Mites: Raise humidity level around plants using misting or pebble trays. Spider mites hate moisture. Spray plants completely with water, including underneath the leaves.
Spray with neem oil every 5 to 7 days. Mix as directed and spray in early morning or evening. Neem disrupts mite reproduction cycles.
For Whiteflies and Mealybugs: Use yellow sticky traps to trap adult whiteflies. Hang traps near affected plants.
Dip cotton swabs in rubbing alcohol and wipe it directly on mealybugs and whiteflies. The alcohol kills on contact. Repeat every couple of days until they are gone.
Neem oil is effective on both pests, but you’ll need to apply it several times. To break the reproduction cycle, spray weekly for 3-4 weeks straight.
| Pest Type | Size | Color | Location | Best Treatment |
|---|---|---|---|---|
| Aphids | 1-3mm | Green, black, yellow | New growth, leaf undersides | Water spray, soap spray |
| Spider Mites | 0.5mm | Red, brown | Leaf undersides | Increase humidity, neem oil |
| Whiteflies | 2mm | White | Leaf undersides | Yellow sticky traps, neem oil |
| Mealybugs | 3-5mm | White, cottony | Leaf joints, stems | Alcohol swabs, neem oil |
Brown Leaf Tips and Edges: The Air Quality Issue
Dry and scorched brown tips and edges mar the otherwise beauty of healthy plant growth. This frequent cosmetic concern indicates environmental strain and not disease. There are a number of reasons why your leaf edges could be browning.
Main Causes of Brown Tips
Low Humidity: The vast majority of houseplants come from tropical climates and are used to higher humidity. Indoor air that’s too dry, particularly from winter heating, will draw moisture from leaf edges faster than plants can replenish it. The tissue then dies and goes brown.
Water Quality Issues: Your tap water has chlorine, fluoride and dissolved salts. These chemicals concentrate in the tips of leaves where water evaporates. Fluoride sensitive plants such as spider plants, dracaenas and prayer plants all exhibit the browning of tips due to fluoride sensitivity.
Fertilizer Salt Buildup: Excessive fertilizing or use of poor-draining soils results in salt buildup around your plant roots. Salt leaches moisture away from roots, and accumulates at the tips of leaves, where it burns them brown.
Inconsistent Watering: Repeatedly drying the soil out entirely puts plants under stress. The plant can’t keep moisture in its extremities, and the tips die back. Then overwatering to make up for it adds more stress.
Solving Brown Tip Problems
Increase Humidity: Group plants together to form a microclimate of higher humidity. Place pots in pebble-filled trays with water just below the bottom of the pots. Water evaporates around plants without waterlogging the roots.
Have a humidifier running near plant collections. Most houseplants prefer between 40 and 60% relative humidity. Humidity tends to be naturally higher in bathrooms and kitchens.
Improve Water Quality: Fill watering cans and let water sit overnight before use. Chlorine evaporates during this time. For fluoride sensitive species, use distilled or rainwater rather than tap water.
Water until the liquid drains from the bottom, then discard this runoff. This prevents salt accumulation.
Flush the Soil: Every 2-3 months, take plants to the sink or outside. Water the plant generously until water runs through the soil for a few minutes. This draws out the accumulated salts and minerals.
Use half-strength fertilizer rather than full concentration. Feed less often—once every 4-6 weeks during growing season is plenty for most plants.
Trim Damaged Leaves: Trim the brown tips with clean scissors at an angle to follow the natural shape of the leaves. This will restore appearance as new, healthy growth continues. These environmental solutions solve these common home gardening plant problems and avoid future damage.
Stunted Growth: When Plants Just Stop
Plants that look healthy but won’t grow perplex many gardeners. No new leaves emerge. Existing leaves stay small. The plant appears frozen in time despite regular care.
Why Growth Stops
Rootbound Conditions: Roots filling the pot with no space to spread equals growth stops. Rootbound plants have roots that are circling the inside of a pot, coming out from drainage holes or appearing at the soil surface.
With no room for roots, the plant can’t support new leaf growth. All energy goes to sustaining the current foliage.
Nutrient Depletion: There are enough nutrients in potting soil for 2-3 months. After which, plants need supplemental feeding. Plants will not grow in depleted soil because it lacks the building blocks for new tissue.
Wrong Light Conditions: Not enough light prevents photosynthesis which is required for growth. Plants can survive in low light, but they won’t actually grow. Plants may also become stressed into dormancy by excessive direct sun.
Seasonal Dormancy: Many plants slow down or go dormant during the winter. Shorter days and cooler temperatures prompt rest periods. This is natural and does not need fixing.
Encouraging Active Growth
Check Root Conditions: Gently slide the plant out of its pot. If roots loop densely with little visible soil, it’s time to repot. Select a container 2 inches larger in diameter than the pot you have.
Loosen circling roots with your fingers. Trim overly long or dead roots. Fill the new pot with fresh potting mix and plant at the same level as before.
Feed Regularly: Use balanced liquid fertilizer during spring and summer growing months. Dilute to half strength and apply every 2-4 weeks. Choose fertilizers with equal N-P-K ratios such as 10-10-10 or 20-20-20.
Slow-release granular fertilizers feed at a steady rate for 3-6 months. Sprinkle on soil surface and water in.
Adjust Lighting: Move plants nearer windows if growth seems sluggish. As a general rule, most plants require bright, indirect light to actively grow. South and west-facing windows provide the brightest natural light.
Consider supplemental grow lights for dark rooms or winter periods. LED grow lights are energy-efficient and effective. Place 6-12 inches above plants for 12-14 hours daily.
Be Patient in Winter: Accept slower growth in fall and winter. Reduce watering and stop fertilizing. Resume regular care as days lengthen in spring. Look for new growth as evidence the plant has broken dormancy.
Leaf Spots and Fungal Diseases
Circular spots, powdery coatings or fuzzy growth on leaves are symptoms of fungal or bacterial infections. These illnesses can spread rapidly in the right conditions and can wipe out whole plants if not controlled.
Types of Leaf Diseases
Fungal Leaf Spots: Brown or black circular spots with yellow edges develop on leaves. The spots are often concentric rings like targets. Water splash from leaf to leaf is the most common way these diseases spread.
Powdery Mildew: Leaves and stems are coated with a white, powdery substance. The plant looks like someone sprinkled flour on it. Powdery mildew thrives in humid conditions with poor air circulation.
Botrytis (Gray Mold): Fuzzy gray or brown mold appears on dying or dead plant tissue. In high humidity, it spreads to healthy tissue. Botrytis commonly affects flowers, causing them to rot while still on the plant.
Disease Prevention and Treatment
Cultural Controls: Water plants at the soil level rather than overhead. Wet foliage encourages disease development. Water in the morning, so moisture on leaves dries by afternoon.
Improve air circulation around plants. Don’t crowd plants together. Prune dense growth to allow airflow. Place fans near indoor plant collections.
Remove infected leaves immediately. Do not compost them—throw them away. Clean pruning tools with rubbing alcohol between cuts to prevent spreading disease.
Fungicide Applications: Many fungal diseases can be controlled with organic fungicides made from sulfur, copper or neem oil. According to Cornell University’s plant disease management guide, applying fungicides at the first signs of infection provides the best control.
Spray thoroughly, covering both sides of leaves. Repeat every 7-10 days for 3-4 applications. Stop using fungicides when symptoms clear and new growth looks healthy.
Baking Soda Spray: Mix 1 tablespoon baking soda, 1 tablespoon vegetable oil and 1 drop of dish soap in 1 gallon water. Spray on affected plants weekly. Baking soda changes leaf surface pH, making it inhospitable for fungi.
This homemade remedy works best as prevention or for mild infections. Severe cases require stronger fungicides.
Leggy, Stretched Plants: The Light Problem
Plants that grow tall and thin with large gaps between leaves look weak and unattractive. This “legginess” results when plants stretch toward insufficient light. The plant realizes it requires more light and attempts to reach it.
Why Plants Get Leggy
Inadequate Light Intensity: Plants need certain light levels for compact growth. When light is too dim, they grow elongated stems and smaller leaves spaced far apart. The plant sacrifices sturdy structure to search for better light.
Wrong Light Direction: Light coming from only one direction causes plants to lean and stretch toward that source. Plants grow lopsided and top-heavy.
Too Much Nitrogen: Excess nitrogen fertilizer promotes rapid, soft growth. Stems elongate quickly without developing strength. The plant produces lots of leaf area but weak structure.
Fixing Leggy Growth
Increase Light Exposure: Move plants closer to windows or into brighter locations. Most houseplants need bright, indirect light for compact growth. Direct morning sun is gentler than harsh afternoon sun.
Rotate plants weekly so all sides receive equal light. This prevents lopsided growth toward the window.
Use Grow Lights: Supplement natural light with LED or fluorescent grow lights. Position lights 6-12 inches above plants for 12-16 hours daily. Closer placement provides more intense light.
Full-spectrum bulbs provide all wavelengths plants need for photosynthesis and compact growth. These common home gardening plant problems solved with proper lighting prevent future legginess.
Prune Strategically: Cut leggy stems back by one-third to one-half their length. Make cuts just above a leaf node (where leaves attach to stem). New growth will emerge more compact in better lighting.
For severely leggy plants, cut back to 4-6 inches from the soil. This drastic pruning forces the plant to start over with bushier growth. Only do this with vigorous plants in spring.
Adjust Fertilizing: Reduce nitrogen application if plants seem to be growing too fast and weak. Switch to balanced fertilizers rather than high-nitrogen formulas. Feed less frequently—every 6-8 weeks instead of monthly.
Dropping Leaves: Stress Response
Plants that suddenly drop leaves—especially healthy-looking green leaves—signal stress. Leaf drop is a survival mechanism. The plant sheds leaves to conserve resources during difficult conditions.
Common Causes of Leaf Drop
Environmental Changes: Moving plants to new locations, changes in temperature, or sudden humidity fluctuations trigger leaf drop. Plants acclimate to specific conditions and react to changes by dropping foliage.
Bringing outdoor plants inside for winter commonly causes massive leaf drop as plants adjust to reduced light and lower humidity.
Watering Extremes: Both overwatering and severe underwatering cause leaf drop. Consistently wet soil suffocates roots, while bone-dry soil stresses the plant. Either extreme prompts the plant to shed leaves.
Temperature Stress: Cold drafts from windows or air conditioning cause rapid leaf drop. Heat stress from vents or direct sun has the same effect. Most houseplants prefer stable temperatures between 65-75°F.
Pest Infestations: Heavy pest infestations weaken plants significantly. As pests drain resources, the plant drops leaves to survive. Check carefully for spider mites, scale, or other insects.
Stopping Leaf Drop
Minimize Environmental Changes: Acclimate plants gradually to new conditions. When bringing plants indoors, start by placing them in their indoor location for a few hours daily. Increase the time over 1-2 weeks before permanent transition.
Keep plants away from drafty windows, heating vents, and air conditioning units. Maintain consistent temperatures and avoid temperature swings greater than 10-15 degrees.
Stabilize Watering: Develop a consistent watering schedule based on soil dryness rather than calendar dates. Check soil moisture before watering. Water thoroughly when the top inch feels dry.
Use pots with drainage holes. Ensure water drains completely after each watering. Empty saucers so plants don’t sit in standing water.
Provide Transition Care: When plants drop leaves from stress, increase humidity and provide bright, indirect light. Don’t fertilize stressed plants—wait until new growth appears. Prune only dead branches.
Be patient. Most plants recover within 4-8 weeks if underlying stress is corrected. New leaves will grow once the plant adjusts to improved conditions.
Frequently Asked Questions
Why do my plants keep dying despite following care instructions?
Plants may die from accumulated stress factors. One problem often triggers others—overwatering leads to root rot which invites fungal disease. Assess all aspects of care: light, water, soil quality, pot size, pests, and environmental conditions. These common home gardening plant problems solved individually prevent cascading failures.
How can I tell if my plant needs more or less water?
Stick your finger 2 inches into the soil. If it feels dry, water thoroughly. If it feels moist, wait. Underwatered plants show drooping that improves after watering. Overwatered plants stay wilted even in wet soil and show yellow leaves and mushy stems.
Should I remove all yellow leaves immediately?
Wait until leaves are completely yellow before removing them. Partially yellow leaves still photosynthesize and provide some energy. Once fully yellow, gently pull them off or cut at the base. Always remove diseased or pest-damaged leaves immediately to prevent spreading.
Can plants recover from severe problems?
Most plants recover from single major problems if caught early. Multiple simultaneous issues reduce survival chances. Plants with at least 50% healthy roots and some green foliage usually recover with proper care. Be patient—recovery takes weeks or months depending on problem severity.
How do I prevent problems instead of just treating them?
Prevention starts with proper plant selection. Choose plants suited to your available light and humidity. Use quality potting soil and pots with drainage. Water consistently based on soil dryness. Inspect plants weekly for early pest detection. Feed during growing seasons only.
Are expensive fertilizers and treatments necessary?
Not usually. Basic fertilizers work as well as expensive brands. Homemade pest sprays from soap and water or neem oil handle most issues. The quality of basic care—proper light, appropriate watering, good soil—matters more than expensive products.
When should I give up on a struggling plant?
If a plant has lost all leaves, shows no green tissue, has completely mushy roots, or hasn’t responded to treatment for 3+ months, it’s likely too far gone. Focus energy on healthy plants or start fresh with a new plant and improved care practices.
Your Healthier Garden Starts Now
Solving common home gardening plant problems becomes easier with experience. Each problem teaches you to read plant signals more accurately. You’ll start noticing subtle symptoms before they become serious issues.
Remember that plant care isn’t about perfection. Even expert gardeners lose plants sometimes. The key is learning from problems rather than feeling defeated by them. Each challenge builds your knowledge and problem-solving skills.
Start by thoroughly assessing your current plant problems. Take photos to track progress over time. Make one change at a time so you can identify what actually works. Document what you learn in a simple garden journal.
Most importantly, don’t panic when problems appear. Yellow leaves, pests, wilting, and spots are all solvable with the techniques covered in this guide. Take a deep breath, identify the real cause, and apply the appropriate solution.
Your plants want to thrive. They’re incredibly resilient when given proper conditions. With the practical knowledge from this guide, you’re equipped to diagnose issues accurately and fix them effectively.
Walk outside or to your plant collection right now. Look closely at each plant. Check soil moisture. Inspect for pests. Notice any discoloration or unusual growth patterns. Early detection makes every problem easier to solve.
These seven common home gardening plant problems solved represent the vast majority of issues home gardeners face. Master these solutions and you’ll handle almost anything your garden throws at you. Your plants—and your confidence—will flourish as a result.