

7 Secret Indoor Home Gardening Growth Hacks
Why Your Indoor Garden Needs This Game-Changing Advice
A lot of plants are easy to grow indoors — until they’re not. Yellow leaves, droopiness and slow growth can all indicate that a plant isn’t getting what it needs. Most people think indoor gardening is simply water and sunlight, but it’s much more.
You’ve likely watched YouTube videos and read dozens of articles. Perhaps you’ve even killed a couple plants in the process. That’s normal. Every successful indoor gardener has a plant graveyard in their history.
The good news? You don’t need fancy equipment or a green thumb to make it work. These seven growth hacks will transform the way you think about growing plants indoors.
Whether you are planting culinary herbs on your kitchen counter or transforming your living room into an indoor jungle, these strategies can be used by both the greenhorns and the experienced gardeners among us. They’re grounded in science but written in plain English.
These are the same techniques commercial greenhouse growers use. Only they have fancy equipment and big budgets. You will learn how to achieve the same results with things from your kitchen and a few simple tools from any hardware store.
Here are some of the secrets that professional indoor gardeners put into practice every day.
#1: The Coffee Grounds Trick that Boosts Plant Growth Like Crazy
Your morning cup of coffee has more use than just waking you up. Those used coffee grounds in your trash are gold for indoor plants.
Why Coffee Grounds Work Wonders
Coffee grounds are rich in nitrogen, potassium and phosphorus. These are the three primary nutrients plants crave. When you add them to soil, they bind with and retain those nutrients, slowly releasing them over the long term.
They also improve soil texture. Hard, packed soil becomes loose, fluffy and much lighter. This enables roots to breathe better and grow faster.
The Right Way to Use Coffee Grounds
Never dump wet coffee grounds right on your plants. That can lead to mold and bugs. A smart way to do it:
The first time, sprinkle used grounds on a plate or tray. Allow them to dry out completely for 24-48 hours. There will be no moldy or bad smell from the dry grounds.
Incorporate one tablespoon of dried grounds to the top inch of soil. Do this once every two weeks. For bigger pots (that’s 5 gallons or more), use two tablespoons.
You can also brew tea with coffee grounds. Soak 1/2 a cup of grounds in 1 gallon water overnight. Then, water your plants with this once a week.
Best Plants for Coffee Grounds
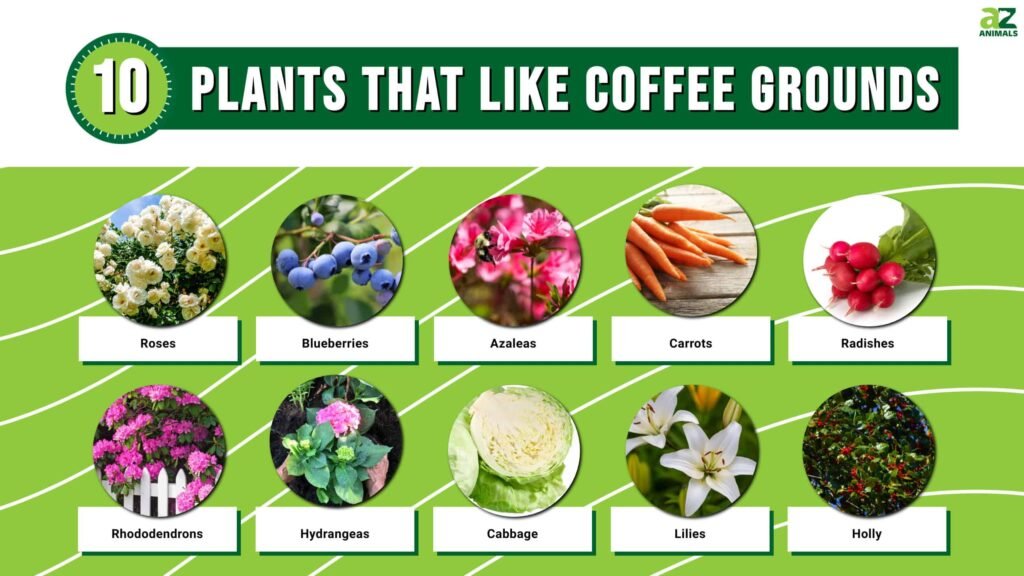
Coffee grounds are not loved by all plants equally. These plants respond best:
- Tomatoes
- Roses
- Blueberries
- Azaleas
- Carrots
- Radishes
Do not use coffee grounds on succulents, or on cacti. They prefer different soil conditions.
Hack #2: The Eggshell Calcium Boost Your Plants Crave
To throw out eggshells is to toss a source of free plant food. Eggshells are 95% calcium carbonate, an important building block for plants’ cell walls.
The Calcium Connection
Blossom end rot in tomatoes and peppers is caused by calcium deficiency. Likewise, it strengthens stems and plants’ resistance to diseases. Indoor plants generally respond very well to the addition of calcium.
Creating Eggshell Powder
Wash eggshells really well to ensure there is no egg left on them. Residual egg bacteria can hurt plants.
Bake shells at 200°F for 10 minutes. This kills the remaining bacteria and makes shells brittle.
Pulverize baked shells in a coffee grinder or mortar and pestle. The finer the powder, the more quickly plants take up nutrients.
With the back of a spoon, break up clumps and store in an airtight container. It stays good for months.
Application Methods
Spread one teaspoon of eggshell powder in the soil around each plant once a month. Water thoroughly after application.
For quick absorption: eggshell water. Put crushed shells in a jar of water. Let it sit for three days. You can use this calcium-rich water for subsequent watering.
| Plant Type | Amount of Eggshell | Frequency |
|---|---|---|
| Herbs | 1/2 tsp | Every 3 weeks |
| Vegetables | 1 tsp | Every 2 weeks |
| Flowering plants | 1.5 tsp | Every 2 months |
| Large Pots | 2 tsp | Weekly |
#3: The Banana Peel Potassium Hack
When it comes to providing nutrients for plants, banana peels are no joke. They’re packed with potassium, which encourages plants to flower and fruit.
Potassium Power
Water movement in plants is controlled by potassium. It strengthens roots and resistance to disease. Plants that receive adequate potassium yield larger and better-quality flowers and fruits.
Three Alternative Banana Peel Uses
Method 1: Direct Burial
Slice fresh banana skin into small portions. Plant them two to three inches deep in the soil around your plant. They break down slowly, and feed plants for weeks.
Method 2: Banana Peel Tea
Finely chop 4-5 banana peels and soak them in a gallon of water. Allow it to sit for 48 hours. Strain the peels and use the liquid to water plants once a week.
Method 3: Dried Peel Powder
Dry banana peels in a dehydrator or low oven (200°F for about 2 hours). Grind dried peels into powder. Mix one tablespoon into soil once a month.
Watch for These Results
In two weeks, you’ll see darker green leaves. Flowering plants will have more blossoms. Fruiting plants such as tomatoes will produce more and larger fruit.
Hack #4: The LED Light Spectrum Trick That Makes Things Grow Twice As Fast
Natural light, i.e., sunlight won’t ever reach your indoor plants properly. Windows block out key light wavelengths. Your solution: LED grow lights.

Understanding Plant Light Needs
Plants require different colors of light at different stages. Blue light promotes leaf growth. Red light promotes blossom and fruit.
Many typical LED bulbs don’t emit the correct spectrum. Grow lights are designed for plants and plants only.
Choosing the Right LED Setup
Simply seek out full-spectrum LED grow lights. Those hold all the colors plants require. They cost a bit more to buy, but consume far less electricity and last years longer than old-style lights.
Place lights 6-12 inches above the top of plants. Too close burns leaves. Too far wastes light energy.
Keep lights on for 12-16 hours a day for most plants. Use a timer for consistency. Plants simply do good when put on a light schedule.
Budget-Friendly Options
You don’t need expensive setups. Simple LED grow light bulbs are regular light bulb shape. These are $15-30 and work great for little windowsill herb gardens.
For larger setups, LED strip lights are ideal. Put them under shelves or in cabinets. A 2-foot strip costs about $25.
| Light Type | Coverage Area | Cost Range | Best For |
|---|---|---|---|
| LED Bulb | 1-2 plants | $15-30 | Herbs, small plants |
| LED Strip | 4-6 plants | $25-50 | Shelf gardens |
| Panel Light | 10+ plants | $80-200 | Serious growers |
| Clip Lamp | 2-3 plants | $20-40 | Desktop gardens |
Hack #5: The Secret Of Air Circulation That Eliminates Disease
Stagnant air provides ideal environments for mold, fungus and weak stems. Air in motion strengthens and invigorates plants, and keeps trouble at bay.
Why Plants Need Moving Air
In the natural world, wind is strengthening for plants. Stems bend and grow cells with thicker walls. This process is called thigmomorphogenesis.
The circulation of air also results in lower humidity on leaves. Powdery mildew and other fungal diseases thrive in high humidity.
Setting Up Proper Airflow
Put a little fan by your plants. It doesn’t have to blow directly on them. Gentle, indirect air circulation is great.
Turn the fan on for 2-4 hours a day. Some growers have timers do this for them. Others run fans nonstop at the lowest speed.
Position fans to create cross-ventilation. One brings in air, and the other pushes it out. This is what leads to natural air movement patterns.
Signs of Good Air Movement
Leaves should sway slightly. You should not see droplets of water sitting on leaves for hours. Allow the surface of the soil to dry between waterings, but not to crack.
Give plants good air movement, and in a week they’ll grow thicker stems. They also are less attractive to pests because bugs like still air.
Hack #6: The Temperature Swing Trick
Steady temperature is great for human comfort but in fact plants do better with the day/night temperature cycle.
The Science Behind Temperature Swings
It is hotter in the day than at night in nature. Plants adapted to make use of that pattern. Hot days prompt photosynthesis and growth. Cool nights allow plants to break down nutrients and build up.
To promote growth, there should be a 10-15°F variation between day and night temperatures. In most houses this is provided naturally by heating and cooling cycles.
Creating the Perfect Temperature Range
During “daytime” (lights on) keep 70-75°F. During nighttime (lights off), allow temp to drop to between 60-65°F.
Avoid setting plants near heating vents or air conditioners. Extreme temperature changes stress plants.
Use a common thermometer to check temperature. Digital models with min-max memory indicate daily temperature ranges.
Temperature and Light Requirements for Common House Plants
| Plant Type | Day Temp | Night Temp | Tolerance Range |
|---|---|---|---|
| Herbs | 70-75°F | 60-65°F | 55-80°F |
| Tomatoes | 75-80°F | 65-70°F | 60-85°F |
| Lettuce | 65-70°F | 55-60°F | 50-75°F |
| Peppers | 75-85°F | 65-70°F | 60-90°F |
| Orchids | 70-80°F | 60-65°F | 55-85°F |
Hack #7: How (and Why) to Water Your Plant Through the Bottom
Indoor plants are like pets: Most people kill them with kindness through overwatering. This is no longer an issue when bottom watering.
Why Top Watering Fails
With overhead watering the top is frequently wet and the bottom dry. The roots are near the bottom, and so they don’t get enough water.
Top watering also leaches nutrients away from the root zone. It can compact soil down over time.
How to Water from the Bottom
Fill a shallow tray or saucer with water. Set the potted plant down in the water. Let it sit for 20-30 minutes.
The water soaks into the soil through drainage holes. Roots suck water up as required. This encourages deeper root growth.
Remove the pot when the soil on its surface feels damp. Do not let plants sit in water all day. This causes different problems.
Bottom Watering Schedule
Most plants will need to be bottom watered once or twice a week. Check soil moisture before watering. Insert your finger 2 inches into the soil. If it’s dry, water. If it’s moist, wait.
Succulents and cacti need to be watered every 2-3 weeks. Herbs and most vegetables need watering every 3-4 days.
Benefits You’ll Notice
Bottom watering makes root rot a less common occurrence. Fungus gnats diminish as the surface of the soil remains drier. Plants grow stronger, deeper root systems.
Leaves stay cleaner too. They don’t get wet from above. This reduces disease risk.
Mixing and Matching These Hacks for the Perfect Results
These seven hacks are also better in combination. Here’s a simple weekly routine:
Weekly Checklist:
- Monday: Check the moisture in the soil, bottom water if necessary
- Tuesday: Run circulation fan for 3 hours
- Wednesday: Add coffee ground tea or banana peel tea
- Thursday: Check LED light placement and duration
- Friday: Monitor temperature range
- Saturday: Add eggshell powder (monthly only)
- Sunday: Inspect plants for issues and correct them if necessary
This schedule is not etched in stone. You should adjust it depending on how your plants respond and also what’s in your own schedule. Consistency, not perfection, is the goal.
Tracking Your Success
Keep a simple journal. Take notes on your actions and timing. Record differences in plant condition.
Take photos weekly. Seeing progress is motivating, and it helps you identify issues early on. Position your phone in the same location each time to ensure an accurate comparison.
Measure plant height monthly. You’ll be amazed at the difference these hacks will make. Most growers notice growth at 30-50% faster in the first month.
If you’re a data-loving individual, track in a basic spreadsheet. Keep a record of watering intervals, nutrient addition rates, and growth monitoring. You will notice patterns that allow you to optimize further.
Building Your Own System
Start small. Choose three hacks that seem easiest. Perfect those before you add any more complexity.
A lot of beginner home gardeners start with coffee grounds, LED lights and bottom watering. Just with these three, there’s a dramatic difference.
Add your fan for ventilation once they begin to feel comfortable. Then try banana peels and eggshells. Temperature control is generally considered last, as it demands the least active attention.
The system has the advantage of being flexible. Miss a day? No problem. These hacks are forgiving. They build conditions for success but don’t demand perfection.
Common Mistakes to Avoid
Even with these shortcuts, some blunders can derail your efforts.
Overfeeding Plants
More nutrients isn’t the same as faster growth. Overfeeding causes nutrient burn. Overfeeding is indicated by yellow or brown leaf tips.
Stick to recommended amounts. Less is more in the world of plant nutrition.
Inconsistent Care
Plants thrive on routine. Random watering or shifting lights is stressful. Plants that are stressed tend to grow slowly and attract pests.
Set reminders on your phone. Incorporate plant care into your routine.
Ignoring Individual Plant Needs
These hacks will work for most plants, but certain ones have special needs. Research your specific plants. Modify approaches according to their circumstances.
Succulents require less water and do not use the same soil as herbs. Orchids have unique light requirements. It takes all kinds in gardening.
Frequently Asked Questions
How soon can I expect to see results from these growth hacks?
It usually takes 2-3 weeks for people to notice improvements. The stronger stems and the darker leaves come first. Faster growth and yields occur in 4-6 weeks.
Do I have to do all seven hacks at once?
No, these methods are compatible with each other. If you’re worried, begin with 2-3 hacks. Incorporate more as you become acclimated. But it is perfectly safe to use all seven right from the outset.
Do the hacks apply to outdoor plants?
Absolutely. Coffee grounds and eggshells and banana peels are effective anywhere. The LED light and temperature control hacks are meant for indoor growing, but air circulation can assist outdoor plants as well.
How much will these hacks end up costing me?
Many of the ingredients are free kitchen scraps. An entry-level LED grow light will set you back $15-30. You can buy a small fan for $10-20. Everything will cost less than $50 to get started.
Are these hacks natural and safe?
Yes, coffee grounds and eggshells and banana peels are entirely organic. They are safe around kids and pets. LED lights and fans do not have a chemical issue.
My plants still aren’t growing well. What should I do?
Check for pests first. Look beneath leaves and in soil. Also verify your soil quality. Old, compacted soil needs replacement. And make sure you have drainage holes in your pots!
Do these skills work for beginners?
Definitely. In fact, these hacks are even easier than traditional methods. They’re forgiving and difficult to mess up. Novices tend to do better with them than more complex feeding schedules.
Your Journey to Success with Indoor Gardening
These seven hacks will turn indoor gardening from a headache to a joy. You don’t need fancy equipment or years of experience.
Begin with the ones that sound most interesting to you. It could be making coffee ground tea, or it might be the LED lights. Build from there.
The best part? These techniques cost almost nothing. You’re working with kitchen scraps and household supplies. Yet they deliver professional-level results.
Your indoor garden can bring you year-round fresh herbs, vegetables and beautiful flowers! These hacks accomplish it without complex systems and expensive products.
Provide your plants with what they really need: light, air, water, nutrients and a good temperature. The rest is natural selection.
Taking Action Today
Choose one hack to try this week. Just one. Don’t try to do everything all at once and get overwhelmed.
For those who drink coffee, begin saving those grounds. If you have a sunny windowsill but your plants are still struggling, buy an LED bulb. For plants that sit in stagnant air, put a fan nearby.
Small changes create big results. Even slight improvements in plant conditions can be cited quickly.
What Success Looks Like
In two weeks’ time, the stems will be strengthened and the leaves should darken. Plants will grow more upright with less leaning and drooping.
By the 4th week, growth rate becomes visibly higher. New leaves emerge faster. Stems thicken. Your plants thrive.
Two months of applying tips like these, and your indoor garden will be unrecognizable. Friends will want to know your secrets. You’ll have healthy plants that are vibrant instead of simply surviving.
Try one hack today. You won’t know how you gardened without these secrets by next month. Your flourishing indoor garden will be the proof.
Keep in mind every master gardener was once where you are today. The difference between them and struggling gardeners isn’t talent. It’s knowledge and consistency. You now have the knowledge. For more comprehensive guidance and resources, check out the Iowa State University Extension’s indoor plant growing guide. Then all that remains is action.