Introduction: Why Light Makes or Breaks Your Indoor Garden
Growing plants indoors can be one of the most rewarding hobbies you’ll ever start. But here’s the truth most beginners don’t realize: light is everything.
Without proper lighting, even the healthiest seeds and the richest soil won’t save your plants. They’ll stretch toward windows, turn pale, and eventually give up. The good news? You don’t need a greenhouse or a sunny climate to grow amazing plants indoors.
This guide reveals 10 powerful indoor home gardening lighting tips that actually work. Whether you’re growing herbs in your kitchen, vegetables in your basement, or exotic flowers in your spare room, these strategies will help your plants thrive like never before.
Let’s dig in and transform your indoor garden with the right light.
1. Match Your Light Type to Your Plant Goals
Not all indoor lights are created equal. The type of light you choose depends entirely on what you’re trying to grow.
Different Lights for Different Plants
Leafy greens like lettuce and spinach need different light than fruiting plants like tomatoes and peppers. Flowering plants have yet another set of requirements.
LED grow lights are the champion for most indoor gardeners. They use less electricity, produce less heat, and last for years. They come in full-spectrum versions that mimic natural sunlight perfectly.
Fluorescent lights work great for seedlings and herbs. They’re affordable and easy to find at any hardware store. The T5 fluorescent tubes are particularly popular because they’re bright and energy-efficient.
High-Intensity Discharge (HID) lights are powerful options for serious gardeners growing fruiting plants. They’re hotter and more expensive to run, but they deliver incredible results for plants that need intense light.
Quick Light Selection Guide
| Plant Type | Best Light Option | Why It Works |
|---|---|---|
| Herbs & Leafy Greens | LED or T5 Fluorescent | Energy-efficient, cool running |
| Flowering Plants | Full-Spectrum LED | Supports all growth stages |
| Fruiting Vegetables | HID or High-Watt LED | Provides intense light needed |
| Seedlings | T5 Fluorescent | Gentle, cool, budget-friendly |
The secret is simple: know what you’re growing, then pick your light accordingly.
2. Get the Distance Right Between Lights and Plants
This tip alone can save your plants from disaster.
Too close, and you’ll burn your leaves. Too far, and your plants will stretch and weaken trying to reach the light.
The Perfect Distance Formula
For LED lights, start with 12-24 inches above your plants. LEDs run cooler, so you can get closer without burning.
Fluorescent lights should sit 3-12 inches from plants. They produce less heat and less intensity.
HID lights need much more space—typically 24-60 inches depending on wattage. These lights run hot and can scorch leaves quickly.
Here’s a smart trick: hold your hand at plant level for 30 seconds. If it feels uncomfortably hot, your plants feel it too. Raise the light.
Adjust as Plants Grow
Your lighting distance isn’t set in stone. As plants grow taller, you’ll need to raise your lights to maintain the sweet spot.
Many gardeners use adjustable chains or pulleys to make height changes easy. This small investment saves enormous hassle as your garden develops.
3. Time Your Light Exposure Like a Pro
Plants need sleep just like we do. Too much light exhausts them. Too little leaves them weak.
The Day-Night Cycle Matters
Most vegetables and herbs need 12-16 hours of light daily. This mimics a long summer day and keeps them growing strong.
Leafy greens can handle 12-14 hours. Fruiting plants like tomatoes and peppers prefer 14-16 hours during growth phases.
Flowering plants are trickier. Many need specific light schedules to trigger blooming. Some need long days, others need short days with long nights.
Use Timers to Stay Consistent
Buy an automatic timer. This isn’t optional—it’s essential.
Plants love consistency. When light comes on at the same time every day and shuts off at the same time every night, plants respond with vigorous, healthy growth.
Manual switching creates chaos. You’ll forget. You’ll be late. You’ll mess up the cycle. A $10 timer eliminates all these problems.
4. Color Temperature Creates Different Growth Results
Light isn’t just bright or dim. It has color, and that color dramatically affects how your plants grow.
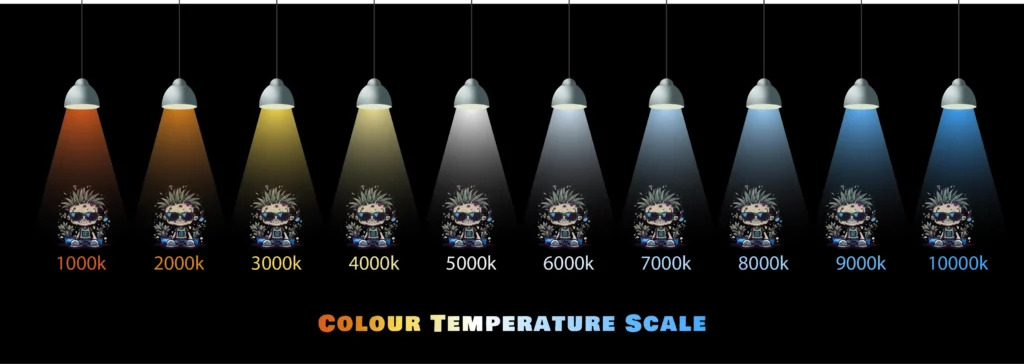
Blue Light for Strong Starts
Blue light (5000-7000K on the color temperature scale) encourages compact, bushy growth. It’s perfect for the vegetative stage when you want strong stems and lots of leaves.
If your plants look leggy and stretched, they probably need more blue light.
Red Light for Flowers and Fruits
Red light (2500-3000K) promotes flowering and fruiting. Once your plants are ready to produce, red-spectrum light tells them it’s time.
Many flowering plants won’t bloom properly without sufficient red light, even if they get plenty of brightness.
Full-Spectrum Covers Everything
Full-spectrum lights include both blue and red wavelengths, plus everything in between. They’re the easiest option because they work for all growth stages.
If you’re growing multiple plant types or don’t want to swap lights constantly, full-spectrum LEDs are your best friend.
5. Rotate Plants to Prevent Lopsided Growth
Ever notice how plants in windows lean toward the light? The same thing happens under grow lights.
The Rotation Strategy
Turn your plants 90 degrees every few days. This ensures all sides receive equal light exposure.
Without rotation, the side facing the light grows thick and healthy while the shadowed side stays weak and spindly.
For larger setups with multiple plants, rotate their positions too. Swap plants from the center of your light setup with those on the edges.
The plants directly under the light get more intensity than those on the periphery. Regular position changes create more uniform growth across your entire garden.
When to Skip Rotation
Some plants don’t need rotation. If you’re using perfectly positioned lights that provide even coverage from all angles, rotation becomes less critical.
Also, once flowering plants set buds, avoid excessive movement. You might knock off flowers or disturb the blooming process.
6. Combine Natural and Artificial Light Smartly
Windows and grow lights aren’t enemies. They’re partners.
Supplement, Don’t Replace
If you have a bright window, use it. Place your plants there and add grow lights to extend the day length or boost intensity.
A south-facing window (in the Northern Hemisphere) provides excellent natural light for 6-8 hours. Add 4-6 hours of grow light, and your plants thrive.
This approach saves electricity and gives plants the full-spectrum benefits of real sunlight. For more home gardening tips for beginners, explore proven methods to create sustainable growing systems.
Watch for Seasonal Changes
Natural light varies with seasons. Your sunny winter window might become scorching in summer.
Monitor your plants’ response. Adjust artificial light timing as natural light increases or decreases throughout the year.
In winter, you might need 8 hours of grow light. In summer, maybe just 2-3 hours to extend the day.
7. Measure Light Intensity for Perfect Results
Guessing doesn’t work. Measuring does.
Get a Light Meter
A basic light meter costs $20-30 and removes all uncertainty. It measures light in foot-candles or lux, showing exactly what your plants receive.
Most vegetables need 2000-3000 foot-candles. Herbs do fine with 1000-2000. Seedlings need just 500-1000 to start.
Flowering plants often demand 3000-5000 foot-candles or more.
The Free Phone App Method
Don’t want to buy a meter? Download a light meter app on your smartphone. They’re not as accurate as professional meters, but they’re good enough for most home gardens.
Take readings at plant level, not from above. The measurement where the leaves are tells you what the plant actually experiences.
Adjust Based on Data
If your meter shows insufficient light, either move plants closer, add more lights, or increase wattage.
Too much light? Raise the lights, reduce hours, or move plants farther away.
Numbers don’t lie. Use them to make smart decisions.
8. Manage Heat to Protect Your Plants
Light and heat go together, but too much heat kills plants fast.
Signs of Heat Stress
Leaves curling up, brown crispy edges, and wilting despite wet soil all signal heat problems. Your lights might be cooking your garden.
Cooling Strategies That Work
LED lights produce the least heat, making them ideal for small spaces or tight setups.
If using HID lights, add circulation fans. Moving air dissipates heat and strengthens plant stems through gentle movement.
Exhaust fans work wonders in enclosed grow spaces. They pull hot air out and bring fresh air in.
Some gardeners use air conditioning in sealed grow rooms during summer. This costs more but gives perfect temperature control.
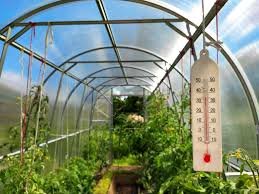
Temperature Sweet Spots
Most plants grow best between 65-75°F during light hours. At night, they prefer temperatures 5-10 degrees cooler.
Keep a thermometer in your grow space. Check it daily. Make adjustments before problems develop.
9. Reflect Light for Maximum Efficiency
Why waste light? Reflective surfaces bounce it back onto your plants, essentially giving you free extra light.
Simple Reflection Methods
White walls reflect about 70-80% of light. If your grow space has dark walls, paint them white or hang white sheets.
Mylar sheeting reflects 90-95% of light. It’s affordable at garden stores and dramatically increases light efficiency.
Aluminum foil works in a pinch but creates hot spots because it’s not a smooth reflector. Use it only as a last resort.
Strategic Placement
Line the walls around your plants with reflective material. Create a three-sided reflective box if possible.
For single-shelf setups, add reflective material to the shelf above and sides. This creates a light chamber that maximizes every photon.
The difference is visible within days. Plants fill out more completely, and growth accelerates.
According to University of Missouri Extension, proper light reflection can increase photosynthetic efficiency by up to 30% in indoor growing environments.
10. Clean Your Lights and Watch Plants Respond
Dirty lights are dim lights. Dust and residue block significant amounts of light.
The Cleaning Schedule
Wipe down your grow lights every two weeks. Use a soft, dry cloth for cool lights or wait until they’re off and cool for hot lights.
Never spray water directly on lights while they’re on or hot. This can shatter bulbs and create electrical hazards.
For stubborn grime, use a slightly damp cloth with a drop of dish soap. Dry immediately and completely.
Check Reflective Surfaces Too
Dust settles on reflective walls and reduces their effectiveness. Clean these monthly to maintain optimal reflection.
The energy and money you’re spending on electricity should reach your plants, not get blocked by a layer of dust.
Real Results: What to Expect from Better Lighting
When you implement these indoor home gardening lighting tips, changes happen fast.
Within one week, you’ll notice plants standing straighter and growing more vigorously. Leaves turn darker green as photosynthesis accelerates.
After two weeks, new growth becomes obvious. Plants produce more leaves, stronger stems, and show better overall health.
By one month, the difference is dramatic. Plants that were struggling now thrive. Harvest times improve, and yields increase.
The best part? These improvements cost less than you think. Better lighting technique matters more than expensive equipment.
Common Lighting Mistakes to Avoid
Even experienced gardeners make these errors:
Using only one type of light for all growth stages. Different stages need different spectrums.
Never adjusting light height. Static setups waste energy and limit growth.
Forgetting to replace old bulbs. Fluorescent and HID lights dim over time, even when they still turn on.
Ignoring the manufacturer’s recommendations. The wattage and coverage area listed aren’t suggestions—they’re requirements.
Overcrowding plants under lights. Every plant needs its share of light. Cramming too many together leaves some in shadow.
Learn from these mistakes without making them yourself.
Frequently Asked Questions
Q: Can I use regular LED bulbs instead of grow lights?
Regular LED bulbs lack the proper light spectrum for photosynthesis. While plants might survive, they won’t thrive. Invest in actual grow lights for real results.
Q: How do I know if my plants need more light?
Watch for these signs: stretching toward light sources, pale or yellowing leaves, slow growth, dropping lower leaves, and failure to flower or fruit.
Q: Is 24-hour light better for faster growth?
No. Plants need a dark period to process the day’s photosynthesis. Constant light stresses plants and can actually slow growth.
Q: Do grow lights increase my electricity bill significantly?
LED grow lights are extremely efficient. Running a 50-watt LED for 14 hours daily costs about $3-5 per month, depending on your electricity rates.
Q: Can I use grow lights in a room where I spend time?
Yes, but bright grow lights can be harsh on human eyes. Many gardeners use timers to run lights while they’re away or asleep.
Q: How long do LED grow lights last?
Quality LED grow lights last 50,000 hours or more—that’s roughly 10 years of daily use. They’re a long-term investment.
Conclusion: Light the Way to Indoor Garden Success
Your indoor garden’s success starts with light. It’s not about luck or having a green thumb. It’s about understanding what plants need and delivering it consistently.
These 10 powerful indoor home gardening lighting tips give you everything needed to create an environment where plants don’t just survive—they flourish.
Start with the basics: choose the right light type, set proper distances, and maintain consistent schedules. Then level up with rotation, reflection, and precise measurements.
The plants in your home are counting on you for their light source. Unlike outdoor gardens where the sun does the work, you control everything indoors.
That responsibility becomes a superpower when you know how to use it. Better lighting means healthier plants, bigger harvests, and the satisfaction of growing fresh food and beautiful flowers regardless of season or climate.
Your indoor garden’s transformation starts with the flip of a switch. Make sure it’s the right switch, at the right distance, for the right amount of time.
The results will speak for themselves, one healthy, vibrant plant at a time.


