Why Your Garden Needs Smart Pruning Today
Ever pruned your favorite shrub, only to see it suffer rather than flourish? You’re not alone.
A lot of gardeners grab their tools and start making cuts without knowing the simple rules that drive success. Pruning isn’t about cutting branches willy-nilly. It’s about building stronger, more abundant flower-producing plants that remain healthy for years to come.
The good news? You don’t even have to be an expert.
This guide leads you through six basic pruning rules that apply to everyone, from the utter novice to avid weekend gardener. You’ll discover when to cut, what tools you need and — most importantly — how to dodge the biggest mistakes that can hurt your plants more than they help them.
Let’s get started! We’ll make your garden the best it can be.
Rule #1: Know Your Plant Before You Prune
Various plants require various care. What’s good for roses may be harmful to your hydrangeas.
Spring Bloomers vs Summer Bloomers
Spring-flowering plants set their buds last summer or autumn. If you prune them in winter or early spring, you are losing all your flowers before they even bloom.
Plants that bloom in spring should be pruned immediately after flowering:
- Lilacs
- Forsythia
- Azaleas
- Flowering cherry trees
- Mock orange
Then there are summer bloomers that can be pruned when dormant in late winter or early spring since they flower on new growth from the same year. This group includes:
- Roses (most varieties)
- Butterfly bush
- Crape myrtle
- Hydrangea paniculata
- Rose of Sharon
The Wood Type Matters
There are two types of wood a plant can flower on: old wood and new wood. Old wood is that which grew the previous year as branches. New wood refers to new growth from this season.
Here’s a quick reference table:
| Type of Plant | When it Flowers | Best Time to Prune | Why This Timing Works |
|---|---|---|---|
| Lilac | Old wood | Right after flowering | Saves next year’s buds |
| Forsythia | Old wood | Right after flowering | Gives new growth time to mature |
| Butterfly bush | New wood | Late winter/early spring | Promotes fresh flowering stems |
| Roses (hybrid tea) | New wood | Late winter/early spring | Encourages strong new growth |
| Azalea | Old wood | Within 3 weeks of flowering | Provides enough time for bud formation |
| Crape myrtle | New wood | Late winter | Creates more summer blooms |
Check Plant Labels and Research
Before you begin cutting, take five minutes to look up the variety of plant you have. Garden centers typically offer care tags with pruning details. You can also look up “[plant name] pruning guide” on the internet for more detailed guidance. For more home gardening tips and techniques, explore comprehensive guides that help beginners master essential skills.
This simple step will save you from the devastation of inadvertently removing all your flowers for the season.
Rule #2: The Right Tools Make All the Difference
A carpenter would not approach every job with a hammer, and neither should you use the same pruning tool on every plant.
Pruning Tools You Really Need
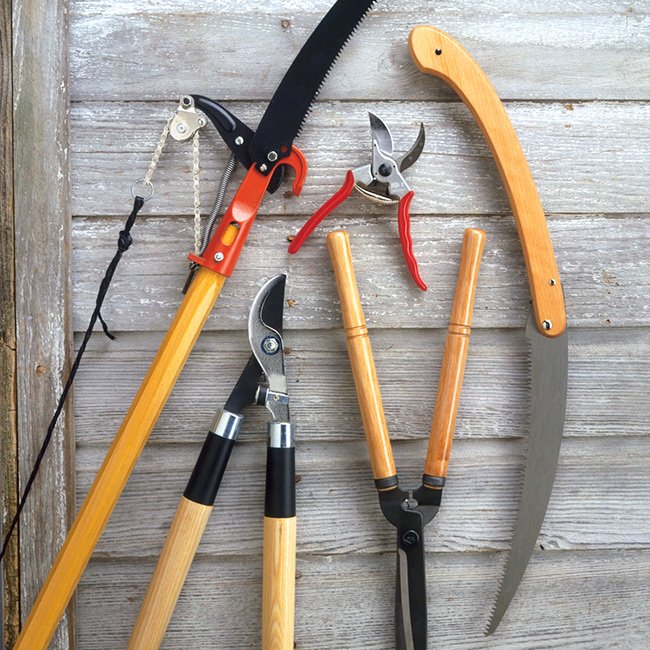
Bypass Pruners (Hand Pruners)
These are basically scissors with two sharp blades that slide past each other. Use them for cutting branches up to 3/4 inch thick. These are great for most shrubs, perennials and small branches.
Never use them on dead wood. They are meant for live plant tissue and will quickly become dull if used improperly.
Anvil Pruners
These work with a straight blade that is brought down against a flat surface. They crush the stem as they cut. Use only on dead, dried-out wood. They crush green plants rather than slice cleanly.
Loppers
Think of these as pruners with long handles. The added length provides extra leverage to enable you to cut through thicker limbs, up to 2 inches. Nice for reaching into thick bushes and cutting through thicker branches.
Pruning Saw
For branches that are greater than 2 inches thick, you will need a saw. Folding pruning saws are convenient to carry about the garden and safer to store. They cut through wood that would otherwise destroy your other tools.
It All Comes Down to Tool Quality
Cheap pruners bend, break and cut poorly — the ragged wound is an open invitation to disease in your plants. Quality tools last a lifetime if you take care of them properly.
Look for:
- Sharp, replaceable blades
- Comfortable grips sized for your hands
- Solid construction without wobbly parts
- Rust-resistant materials
Many professional gardeners swear by brands like Felco — not just because the parts are replaceable, but also because you can buy replacement parts instead of new tools.
Keep Your Tools Clean and Your Blades Sharp
One of the biggest pruning mistakes you can make is using dirty, dull tools. They rip through the plant tissue instead of slicing cleanly. This results in jagged wounds that heal more slowly and are vulnerable to disease.
After each pruning session:
- Wipe excess sap from the blades with a clean rag
- Soak blades in rubbing alcohol to kill any disease organisms
- Dry completely before storing
- Apply light oil or lubricant to prevent rust on moving parts
Sharpen your tools twice a year, or whenever you find that they are crushing rather than cleanly cutting. A few swipes with a sharpening stone take only a minute and make the job of pruning so much easier.
Rule #3: The Three D’s Come First
Before you think about sculpting or guiding growth, attend to the fundamentals. In the trade, this is known as the “Three D’s” solution.
Dead Wood Removal
Dead branches are of no use to your plant and they do harm. They harbor diseases and pests that can spread to healthy sections of the plant.
How to identify dead wood:
- Dry and brittle rather than pliable and supple
- No green inside the bark if you scratch it
- No shoots or leaves growing out of it
- Different color than healthy branches
Trim dead branches to a point where they intersect with living wood. Cut just above a bud or the point where the branch meets a bigger limb.
Dead wood can be removed any time of year. There is no need to wait for a certain pruning season.
Diseased Branch Removal
Diseased wood shows up as:
- Discolored or spotted leaves
- Cankers (dead sunken spots on bark)
- Oozing sap
- Unusual growths or swellings
- Wilted appearance when other branches look fine
Prune off affected branches at least 6 inches below the point of visible damage. That way you get all the infected tissue. Disinfect your pruning tools using rubbing alcohol after each cut in order to prevent spreading diseases to healthy areas.
Never compost diseased plant material. Toss it in the trash or burn if local regulations allow.
Damaged Branch Removal
Storm-damaged, animal-damaged or accidentally broken branches are urgent. Torn bark and splintered wood leave openings for diseases to take hold.
Remove damaged branches and cut back to healthy wood at a slight angle. This helps water run off the cut surface rather than standing on it.
Rule #4: The One-Third Rule Saves Your Plants
This is perhaps the number one rule that will help your plants stay healthy following pruning.
Why Over-Pruning Hurts Plants
Your plants’ leaves are the food makers. Remove too many leaves all at once and you’re depriving the plant of its ability to nourish itself.
Plants also store energy in their branches. Removing too much in a single session is stressful. The plant has to use all the energy it stored up in its roots, rather than being able to grow strong and produce flowers.
Applying the One-Third Rule
Look at your entire plant. Picture that you’ve divided it into thirds. No more than one of those three parts should be removed at any pruning session.
For neglected plants that really need to be cut down hard:
- Year 1: Remove the oldest third
- Year 2: Remove an additional third of mature growth
- Year 3: Complete the transition with the final third
This gradual process ensures that your plant will have time to recover and remain healthy during the transition.
Signs You’ve Removed Too Much
Here are warning signs that you’ve pruned too hard:
- Very little or no bloom the following year
- Excessive sucker growth shooting up from the base
- Weak, spindly new growth
- Smaller than typical leaves
- Overall poor plant health
Rule #5: Cut Cleanly at the Right Angle
How you cut matters as much as what you cut. Bad cuts result in poor healing and disease problems.
The Perfect Cut Location
Wherever you cut, always leave about 1/4 to 1/2 inch above a bud or leaf node. This short distance allows the plant to heal without a long stub remaining.
Make the cut at a gentle angle (about 45 degrees) away from the bud. This slants the cut so that rainwater will run off it, rather than puddle on top and possibly cause rot.
Don’t Leave Stubs
A stub is the part of a branch that remains when you cut too far from a bud. Stubs can’t heal properly because they don’t have a growth node to produce new tissue. They eventually die and become entry points for disease.
If you leave a stub accidentally, cut it back to the right location immediately.
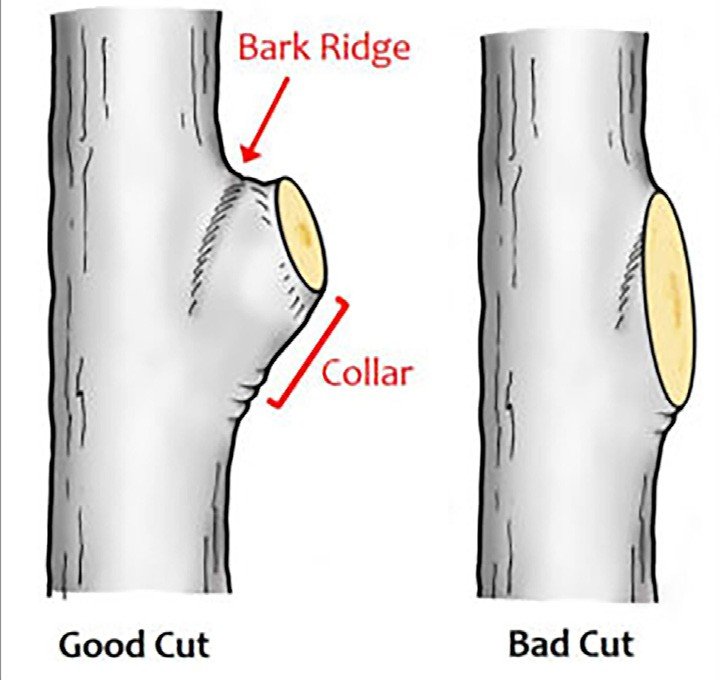
The Branch Collar Rule for Large Branches
If you are removing a whole branch from a tree or large shrub, look for the slightly swollen area at the base of each branch. This is the branch collar.
Make your cut just outside the branch collar. Do not cut flush with the trunk, nor leave a long stub. The collar has special cells to help the tree heal rapidly and shield itself from disease.
Here is a straightforward guide for different types of cuts:
| Type of Cut | Where to Make the Cut | Results | Uses |
|---|---|---|---|
| Heading cut | 1/4-inch above a bud | Produces branching | Shaping shrubs, promoting bushy growth |
| Thinning cut | At point of origin | Removes whole branch | Opening up dense growth, reducing size while retaining natural form |
Rule #6: Timing is Everything
Pruning incorrectly is generally less harmful than pruning at the wrong time. Poorly timed cuts can harm your plant, reduce flowering and even kill it.
Late Winter to Early Spring: The Golden Window
For most plants, late winter when buds first begin to swell but haven’t opened yet is the safest time to prune. Plants are dormant and won’t bleed too much sap. The plant structure is visible, unobstructed by leaves.
This timing works well for:
- Most shade trees
- Summer-flowering shrubs
- Fruit trees (except cherries)
- Roses
Avoid very early winter pruning. Pruning in fall or early winter can create new growth that is susceptible to damage from freezing conditions.
Just After Flowering for Spring Bloomers
Spring-blooming plants must be pruned as soon as their blossoms are spent. This provides them the entire growing season to grow next year’s flower buds.
The window is narrow. Prune within three to six weeks after flowering ends. Wait any longer, and you risk cutting off emerging buds for next spring.
Summer Pruning for Special Cases
There are a few plants that benefit from summer pruning:
- Thinning fruit trees during summer to open up the canopy for better air circulation
- Removing water sprouts (upright shoots) and suckers
- Light shaping of evergreens
- Deadheading (snipping off dead flowers) to stimulate more flowering
Summer pruning slows growth, which is helpful for plants that have become too large.
What Never to Prune in Fall
Pruning in the fall is risky for most trees and plants. New growth encouraged by pruning doesn’t have time to harden off before winter. This tender growth freezes and dies, creating wounds that invite disease.
Avoid fall pruning for:
- Most flowering shrubs
- Roses
- Fruit trees
- Tender perennials
The single exception is dead wood, which can be safely removed at any time.
Plant-Specific Timing Guide
| Plant | Best Time to Prune | What Can Go Wrong if You Prune at the Wrong Time |
|---|---|---|
| Lilac | Right after flowering (late spring) | No flowers next year |
| Rose | Late winter/early spring | Reduced vigor, possible winter injury |
| Oak tree | July-October | Risk of oak wilt disease |
| Maple | Late summer | Excessive sap flow |
| Spring bulbs | After foliage turns yellow | Weak plants, poor bloom |
| Clematis (spring blooming) | After bloom | Loss of flowers |
Common Pruning Mistakes to Avoid
Even when you are following the rules, mistakes can happen. Here’s what to watch out for.
Mistake #1: Pruning with Dull or Dirty Tools
We said this earlier, but it’s worth repeating. Dull blades crush plant tissue rather than cutting through it cleanly. This results in large, ragged wounds that heal slowly and can attract diseases and pests.
Dirty tools are major carriers of plant diseases, transferring infections from plant to plant. Your dirty tools can transfer disease from one infected plant to healthy shrubs, turning one problem into a garden-wide nightmare.
Mistake #2: Flush Cutting Trees
Pruning branches off perfectly flush to the trunk looks neat and tidy. But it removes the branch collar tissue that helps trees heal and defend themselves against disease.
When removing branches, always leave the slightly raised collar. The tree has a natural process for healing this area.
Mistake #3: Topping Trees
Topping is the removal of all or most of the crown, leaving a tree looking mutilated. This destroys the tree’s natural form, creates giant wounds that never fully heal, and encourages weak shoots that break in storms.
If a tree is just too big, you can remove it and plant something smaller more suited to the space. Topping is never the answer.
Mistake #4: Creating Lion’s Tails
Lion’s tailing occurs when you strip out all the inner branches, leaving foliage only at the tips of branches. This results in an unstable tree that becomes susceptible to wind or ice damage.
Keep foliage distributed along the whole branch, not just at the tips.
Mistake #5: Not Stepping Back to Evaluate
It’s easy to get focused on one area and over-prune it. Step back every several cuts so you can examine the overall shape and balance of your plant.
A balanced appearance means:
- Similar density throughout
- Natural form preserved
- Even distribution of branches
- Consistent canopy
Simple Techniques for Better Results
In addition to the six main rules, some tactics can help make your pruning more successful.
The Right Cut Direction
Remove a branch by making the first cut from below (about one-third through), and then cutting from above. This keeps the branch from ripping bark as it falls.
If the branch is extremely heavy, use a three-cut technique:
- Make your first cut from the bottom, 12 inches from the trunk
- The second cut from the top, just a bit further out to remove most of the branch
- The final cut to remove the remaining stub at just the right location
Thinning vs Heading Cuts
Thinning involves removing complete branches all the way to their point of origin. This keeps the natural shape of the plant and allows for light penetration and air movement.
Heading cuts remove only part of a branch. This encourages several new shoots to grow just below the cut, making for denser growth.
Use thinning cuts for the majority of pruning you do. Heading cuts are primarily for formal hedges and to encourage bushiness in young plants.
How to Encourage Specific Growth
Need a branch to grow in a specific direction? Make the cut just above a bud that points in the direction you would like growth to go.
Example: To promote outward growth and open up the center of a shrub, cut above outward-facing buds.
Tools and Safety Tips
Pruning safely protects both you and your plants.
Wear Proper Protection
- Safety glasses: Keep branches from scratching eyes and sawdust out of them
- Gloves: Shield your hands from thorns and splinters
- Long sleeves: Protect arms from scratches
- Closed-toe shoes: Protect feet from dropped tools
Ladder Safety
If you need a ladder to reach it, it’s too high. For any tasks that require climbing or working from a ladder, hire a professional arborist to prune your tree.
Professional tree care workers have the knowledge, tools, safety equipment and insurance to work safely at heights. It’s a small price to pay versus the risk of falling.
Know Your Limits
Some tasks are beyond the expertise of home gardeners:
- Large branches above your head
- Branches near power lines
- Trees that are heavily leaning or damaged
- Chainsaw work above shoulder height
Call in professionals when that is the case. The American Society of Consulting Arborists can help you find qualified tree care professionals in your area.
Seasonal Pruning Calendar
| Season | What to Prune | What to Avoid | Key Tasks |
|---|---|---|---|
| Spring (Early) | Roses, summer-flowering shrubs, fruit trees | Spring-flowering shrubs before they flower | Remove winter damage, shape before growth begins |
| Spring (After bloom) | Lilac, forsythia, azalea, flowering cherry | Summer-blooming plants | Prune directly after the flowers fade |
| Summer | Light shaping, deadheading, thinning vigorous fruit trees | Heavy pruning of most plants | Remove water sprouts and suckers |
| Fall | Nothing except dead wood | As much as possible | Resist the urge to clean up |
| Winter | Deciduous trees and shrubs while dormant | Maple (bleeds excessively), birch | Major structural pruning |
Frequently Asked Questions
Is it okay to prune my plants in the rain?
Avoid pruning in wet weather. Fungal diseases spread more easily when humidity is high. Pruning cuts provide an entry point for such diseases into the plant. Wait for a dry day with 24 or more hours without moisture on plants.
How often should I sharpen my pruning tools?
Hand pruners should be sharpened every six months with normal usage. If you observe crushed stems rather than clean cuts, sharpen right away. Professional gardeners who do heavy pruning may sharpen tools every few weeks during peak season.
Will pruning hurt my plant?
With proper timing and technique, pruning promotes plant health. Plants are adapted to heal themselves, and good pruning cuts heal quickly. Poor pruning or wrong timing can stress plants, but following these six rules minimizes that risk.
What can I do with all the branches I cut down?
Healthy pruned branches can be put in your compost pile or used for mulch if chipped. Dead or diseased debris should be discarded in the trash or burned (where permitted). Never compost diseased plant material, which can spread problems throughout your garden.
Can I prune trees and shrubs that were recently planted?
Wait at least a full year after planting before any real pruning. Young plants need every branch they produce to develop strong root systems. In the first year, only remove dead or damaged wood. Then follow general pruning guidelines for your plant type.
Why didn’t my plant bloom after I pruned it?
You likely pruned at the wrong time and removed the flower buds. Spring bloomers set their buds the preceding summer and fall. By pruning them during winter or early spring, you are cutting away all the flowers. Wait until after flowering is completely finished next time.
How can I tell if a branch is dead or just dormant?
Scrape a little bit of bark with your fingernail or use a knife. If there is green tissue underneath, the branch is alive. Brown, dry tissue means it’s dead. You can also bend the branch — live wood is pliable, dead wood breaks easily.
Is it better to prune too little or too much?
Always err on the side of pruning too little. You can always remove more later, but you cannot put growth back once it is cut. Start with a conservative approach and step back often to evaluate your work.
Your Best Garden Begins Here
Pruning doesn’t need to be difficult or scary. These six basic principles are all you need to ensure your plants stay healthy, beautiful and productive.
Remember:
- Know your plant’s bloom time before you make that cut
- Use sharp, clean tools designed for each task
- Start with the Three D’s (dead, diseased, damaged)
- Never remove more than one-third at a time
- Make clean, angled cuts in the right location
- Prune according to your plant’s growth cycle
Start small. Choose one or two plants to practice these techniques. As you build confidence, you’ll understand what each plant requires.
Your garden will reward you with stronger growth, more flowers and years of beauty. The time you invest in learning the right way to prune will be repaid tenfold in the health and beauty of your plants.
Now grab your pruners and let’s get started. Your best garden is only a few thoughtful cuts away.


